Þessi síða er hugsuð sem yfirlitssíða yfir helstu spurningar sem kunna að vakna um tæknimál á fyrstu stigum skólagöngu í HA og hér að neðan má finna yfirlit yfir þá þætti sem oftast vefjast fyrir fólki. Hér inni á leiðbeiningavef Kennslu- og upplýsingatæknimiðstöðvar Háskólans (KHA) má svo finna leiðbeiningar fyrir flest er viðkemur kerfum og lausnum sem deildin rekur. Leiðbeiningasíðan síða ætti að vera fyrsti viðkomustaður þegar upp koma vandræði með tæknimál.
This site is a FAQ overview that contains answers to the issues that tend to pop up during the first days of school and below you can se the list of different topics. Here on the Wiki page run by the UNAK center for Teaching, learning and IT (KHA) you can find instructions for most things regarding software and other solutions run by the department. The Wiki site should be your first stop when a technical problem occurs.
ALDREI gefa upp lykilorðið þitt og alls ekki senda það með tölvupósti! Ef þig grunar að einhver hafi komist yfir lykilorðið þitt að þá skaltu breyta því strax.
NEVER give up your password and absolutely do not send it via email! If you suspect that someone has managed to come by your email you should change it immediately.
Tveggja þátta auðkenning stuðlar að auknu netöryggi fyrir alla nemendur og starfsmenn.
Auðkenningin er ekki ósvipuð rafrænum skilríkjum og sendir tilkynningu í farsíma til að staðfesta innskráningu.
Smellið á tenglana hér að neðan til að fá leiðbeiningar um uppsetningu á tveggja þátta auðkenningu.
Multifactor Authentication contributes to increased network security for all students and staff.
The authentication sends a notification to a mobile phone to confirm login.
Click on the links below for instructions on setting up Multifactor Authentication.
Farðu inn á aka.ms/mfasetup (betra að gera þetta í öðru tæki en í símanum sem þú notar fyrir tveggja þátta auðkenninguna)
Goto aka.ms/mfasetup (better NOT to do this on the device that you are going to use for the authentication)
Sláðu inn HA netfang og smelltu á Next
Enter your UNAK email and hit Next

Sláðu inn aðgangsorð og smelltu á Sign in
Enter your password and hit Sign in

Smelltu á Next
Hit Next

Setja upp Microsoft Authenticator appið í símann og smella á Next
Install the Microsoft Authenticator app on your phone and hit Next

Smella á Next
Hit Next

Opna Microsoft Authenticator í símanum og bæta við reikningi
Open Microsoft Authenticator on the phone and add account


Skannið QR kóðann sem með símanum og smellið á Next
Scan the QR code with the phone and hit Next

Eftir að aðgangurinn hefur verið settur upp á appið í símanum, þá er betra að loka appinu áður en haldið er áfram
After the account has been set up on the app, please close the app before continuing to the next step
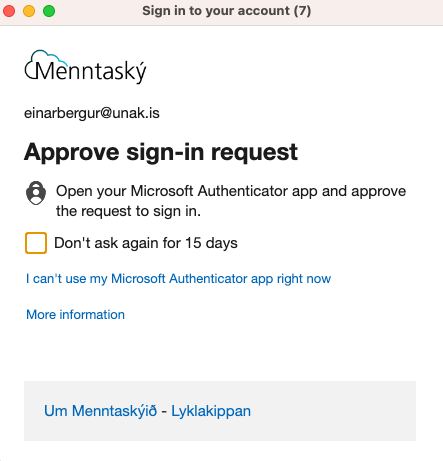
Nú þarf að staðfesta með því að samþykkja í símanum (neðri mynd)
Now you need to Approve on your phone (pic nr 2 below)


Ef staðfesting tókst þá smella á Next
If approving was successful hit Next

Tvíþætt auðkenning er klár smella á Done
Multifactor Authentication is ready hit Done

Við mælum með því að setja upp aðra aðferð eins og til dæmis SMS til þess að hægt sé að skrá sig inn ef ekki er hægt að nota Microsoft Authenticator
We highly recommend adding alternative sign-in method like SMS to use in case the authenticator app can not be used at the moment
Í security info, smellið á “+ Add method”
In “Security info, click on “+ Add method”

Veljið “Phone” og setjið inn farsímanúmer til að fá kóða í smáskilaboðum
Choose “Phone” and enter your mobile phone number to receive code in SMS
Ef vandamál kemur upp sjá / if problems during setup see
Vandamál í uppsetningu / Setup problems
Ef þú lendir í vandamálum í uppsetningu mælum við með þessum skrefum / If you run into problems we recommend taking these steps
Eyða út Menntaskýs aðgangi í Microsoft Authenticator
Delete Menntaský account from Microsoft Authenticator


Byrja ferlið aftur og nota tvö tæki, símann fyrir Authenticator og tölvu til að opna aka.ms/mfasetup
Start again but use two devices, your phone for Authenticator and a computer to open aka.ms/mfasetup
Sjá leiðbeiningar um uppsetningu / See instructions for setup
Uppsetning á tveggja þátta auðkenningu / Setup for Multifactor Authentication (MFA)
Ef það lokast á aðgengi til dæmis sökum þess að ekki er hægt að nota síma, þá er hægt að endursetja tveggja þátta auðkenninguna með því að skrá inn með rafrænum skilríkjum:
If you are unable to access your school account due to no access to the authenticator app and have access to electronic ID on Island.is, you can reset it by:
Fara inn á ugla.unak.is
Goto http://ugla.unak.is
Velja “Gleymt lykilorð?”
Choose “Forgotten password?”

Skrá inn með rafrænum skilríkjum
Log in using electronic ID
Velja skóla “Háskólinn á Akureyri”
Choose school “Háskólinn á Akureyri”
Smella á “Endursetja tveggja þátta auðkenni”
Click on “Endursetja tveggja þátta auðkenni”

Eftir það þarf að fylgja leiðbeiningunum um uppsettningu á tveggja þátta auðkenningu Uppsetning á tveggja þátta auðkenningu / Setup for Multifactor Authentication (MFA)
Follow the instructions Uppsetning á tveggja þátta auðkenningu / Setup for Multifactor Authentication (MFA)
Lykilorði er breytt í Uglu: ugla.unak.is - smelltu á myndina af þér uppi í hægra horninu - veldu “Breyta lykilorði”
Password is updated in Ugla: ugla.unak.is - click the picture in the upper right corner - select “Change password”
Fyrst slærðu inn það lykilorð sem er í gildi (Núverandi lykilorð). Svo skrifar þú nýtt lykilorð í næstu tvo reiti og smellir á "Breyta lykilorði".
First you type in the old password ( the current password). Then you type in the new password in the next two fields and click “Change password”.
ATH að Lykilorð verður að vera minnst tólf stafir að lengd og verður að innihalda að minnsta kosti þrennt af eftirfarandi
Note Passwords must be at least 12 characters of length and must include at least three of the following
Tölustaf / Numeral letter
Tákn / Symbol
stóran bókstaf / Captial letter
lítinn bókstaf / Non capital letter
Ekki er hægt að nota eigið nafn eða notendanafn í lykilorðinu né endurnota síðustu 3 lykilorð. Hægt er að nota íslenska stafi og sértákn en við mælum ekki með því vegna þess að stundum lenda notendur á lyklaborði sem ekki er með íslenska bókstafi.
It is not possible to use your own name or username in the password nor reuse the last 3 passwords. It is possible to use special characters, including Icelandic letters, but we don’t recommend it since sometimes users come across a keyboard without the their prefered language characters.
Ef þú hefur gleymt lykilorðinu þínu þá getur þú endursett það með því að fara á https://lykilord.menntasky.is Þegar þangað er komið þá skráir þú þig inn með http://island.is rafrænu skilríkjunum þínum.
If you forgot your password you can reset it by going to lykilord.menntsky.is, where you log in with electronic ID from ísland.is
ATH!Ef þú ert ekki með rafræn skilríki þarftu að hafa samband við kennslumiðstöð. best er að gera það rafrænt úr tölvupóstfanginu sem þú notaðir þegar þú sóttir um skólavist á helpdesk@unak.is .
NOTE! If you don’t have Icelandic electronic ID from Ísland.is you have to contact KHA. The most efficient way to do that is to contact via email using the mail you used to apply for studying at UNAK at helpdesk@unak.is

Eftir innskráningu er Háskólinn á Akureyri valinn úr fellilistanum
After logging in you select “Háskólinn á Akureyri” from the dropdown menu

Þegar búið er að velja Háskólann á Akureyri þá er nýja lykilorðið slegið inn og aftur í staðfestingar reitinn fyrir neðan og svo smellt á Breyta Lykilorði
After selecting “Háskólinn á Akureyri” from the drop down, the new password is put in the two following fields and then click “Breyta lykilorði”
ATH að Lykilorð verður að vera minnst tólf stafir að lengd og verður að innihalda að minnsta kosti þrennt af eftirfarandi
Note Passwords must be at least 12 characters of length and must include at least three of the following
Tölustaf / Numeral letter
Tákn / Symbol
stóran bókstaf / Captial letter
lítinn bókstaf / Non capital letter
Ekki er hægt að nota eigið nafn eða notendanafn í lykilorðinu né endurnota síðustu 3 lykilorð. Hægt er að nota íslenska stafi og sértákn en við mælum ekki með því vegna þess að stundum lenda notendur á lyklaborði sem ekki er með íslenska bókstafi.
It is not possible to use your own name or username in the password nor reuse the last 3 passwords. It is possible to use special characters, including Icelandic letters, but we don’t recommend it since sometimes users come across a keyboard without the their prefered language characters.

Núna fer af stað keyrsla sem breytir lykilorðinu þínu. Þú færð svo skilaboð um hvort það hafi heppnast eða ekki. Það getur tekið 1-3 mínútur þangað til að nýja lykilorðið er orðið virkt.
Now the system runs the changes on your passwords. You will revceive a message like the one below, telling you if the cange was successful or not. It can take up to 3 minutes for the new password to be enabled on all systems.
Ef lykilorð eru vistuð í vafra, þá er hægt að sýna þau á eftirfarandi hátt.
If passwords are stored in your browser then you can display them like shown below.
Í valmyndinni, veljið “Settings” → “Profiles” → “Passwords” → “Saved passwords”. Finnið viðkomandi síðu þar sem lykilorðið er vistað í og veljið augað til þess að sýna lykilorðið. Sláið inn lykilorðið inn á tölvuna ef þess þarf.
In the main menu select “Settings” → “Profiles” → “Passwords” → “Saved passwords”. Find the desired website and click the “eye” icon to display the password. If prompted type in the log in password for the computer.

Í valmyndinni, veljið “Settings” → “Autofill” → “Password manager”, finnið viðkomandi síðu þar sem lykilorðið er vistað, smellið á augað til að sýna lykilorðið og sláið inn lykilorðið inn á tölvuna ef þess þarf.
In the main menu select “Settings” → “Autofill” → “Password manager”. Find the desired website and click the “eye” icon to display the password. If prompted type in the log in password for the computer.

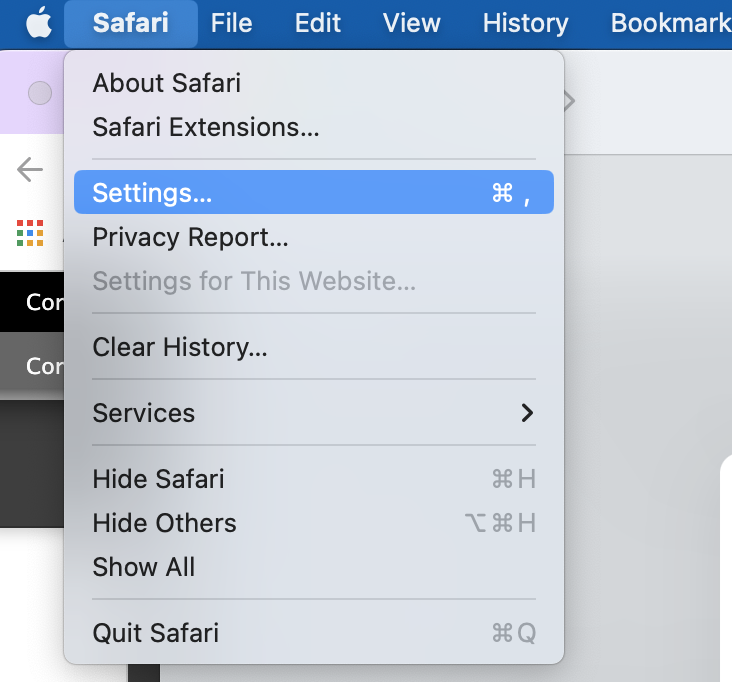
Í valmyndinni, veljið “Safari” → “Preferences” → “Passwords” og sláið inn lykilorðið inn í tölvuna. Smellið á viðkomandi vefsíðu til að sýna lykilorð
In the main menu select “Safari” → “Preferences” → “Passwords” and then type in the log in password for the computer. click the desired website name to show the password.

Það er mikilvægt að notendur skrái sig aldrei inn í hugbúnað eins og til dæmis Teams, OneDrive, Outlook, Word og Powerpoint sem dæmi nema á sínum eigin aðgangi á tölvunni þar sem stýrikerfi tölvunnar getur vistað aðganginn. Það þýðir að hver sem skráir sig inn á þeim aðgangi sem var innskráður getur farið inn á Teams svæði, tölvupóst, gögn og annað sem tilheyrir notandanum sem skráði sig inn. Þess vegna bendum við notendum á að opna huliðsglugga í vafrara og fara þannig inn á ugla.unak.is til þess að komast inn á þeirra svæði.
Ef notandi hefur hins vegar skráð sig inn fyrir slysni, þá skal fylgja þessum leiðbeiningum:
Smella á leitargluggann í windows stýrikerfinu og skrifa “Work or school”. Valmöguleikinn “Work or school users” ætti að birtast í listanum. Smellið á hann

Finnið notendanafnið ykkar í listanum, smellið á örina niður og veljið “Remove”

Nú hafið þið eytt aðgangsupplýsingunum ykkar úr stýrikerfinu. Ef þið hafið hlaðið niður skrám eða skráð ykkur inn á OneDrive, þá þurfið þið að finna þær skrár og eyða þeim handvirkt. Einnig mælum við með því að hreinsa skyndiminni vafrara með því að fylgja þessum leiðbeiningum
Flýtileiðir fyrir flesta vafra = Ctrl + Shift + Delete
MIKILVÆGT: Lokaðu vafranum og endurræstu hann eftir að hafa hreinsað skyndiminni og vafrakökur.
Keyboard Shortcut for Most Browsers = Ctrl + Shift + Delete
IMPORTANT: Be sure and close/quit the browser and restart it after clearing the cache and cookies.
Click the Tools menu (three dotted lines in the upper-right corner).
Select History.

Select Clear Browsing Data from the left-hand side. Set the Time Range set to All Time. Check-mark Cookies and other site data and Cached images and files and select Clear Data.
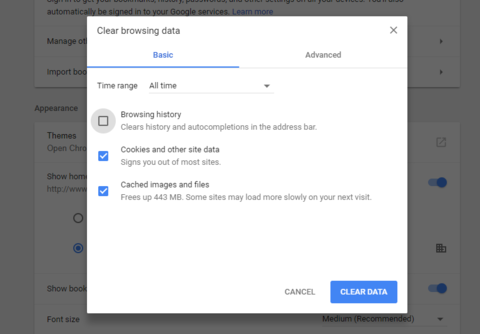
If on a Windows computer, close and re-open Chrome to save your changes. If on an Apple computer, go to the Chrome menu on the top menu bar and select Quit for the changes to take effect.
Click on the Tools bar.
Click on Options (On Mac, it's labeled Preferences).
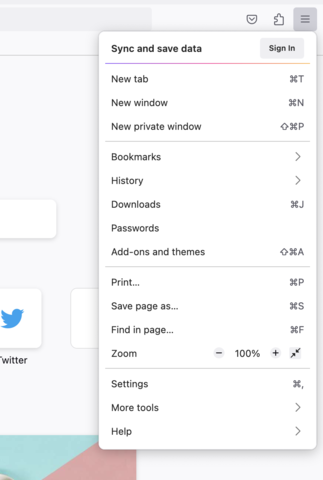
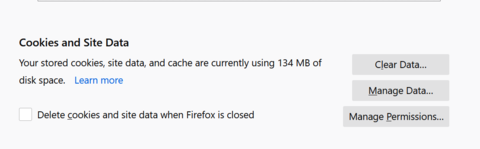
On the menu to the left, select Privacy & Security.
Under the Cookies and Site Data option, click the "Clear Data..." button.
Select only the two options and hit clear now.
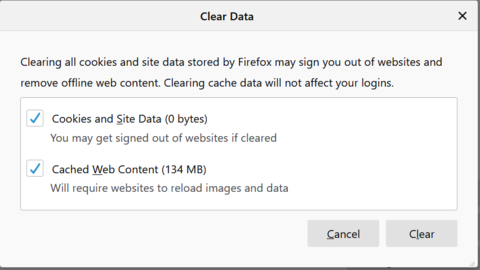
If on a Windows computer, close and re-open Firefox to save your changes. If on an Apple computer, go to the Firefox menu on the top menu bar and select Quit for the changes to take effect.
Click on Safari on the top menu bar.
Click Preferences.
Click the Privacy tab.
Click Manage Website Data...
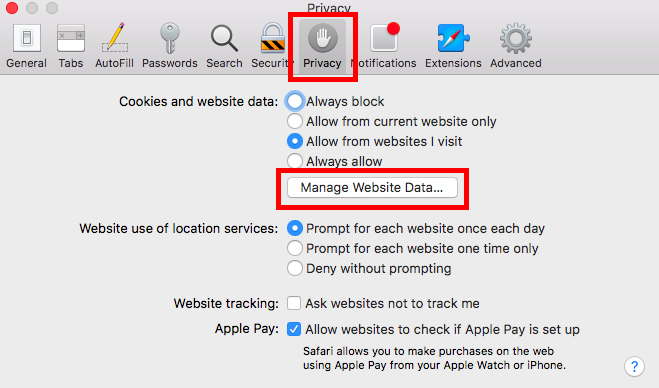
Click Remove All.
Click Remove Now.

Go to the Safari menu on the top menu bar.
Select Quit to close Safari and save your changes.
Click the Tools menu (three dotted lines in the upper-right corner), and open the Settings menu.
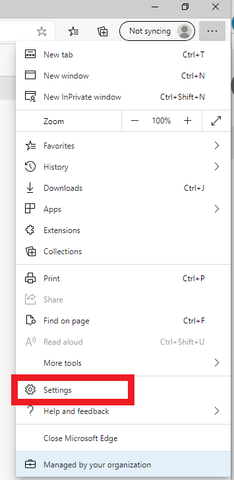
Click Privacy, search, and services on the left-side menu.
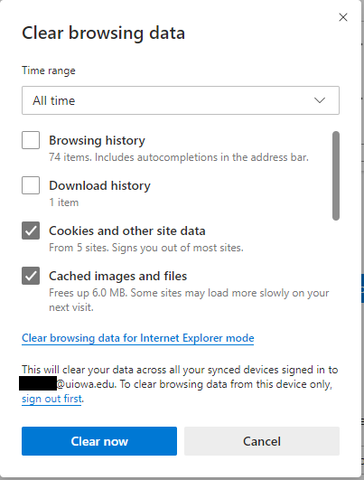
Under the section Clear browsing data, Click Choose what to clear.
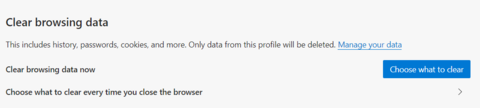
Select Cookies and other site data and Cached images and files.
Click Clear Now.
Close Microsoft Edge completely for your changes to take effect.
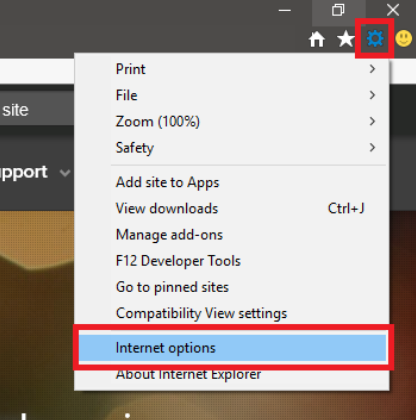
Click on the Settings menu in the upper-right corner.
Click Internet options.
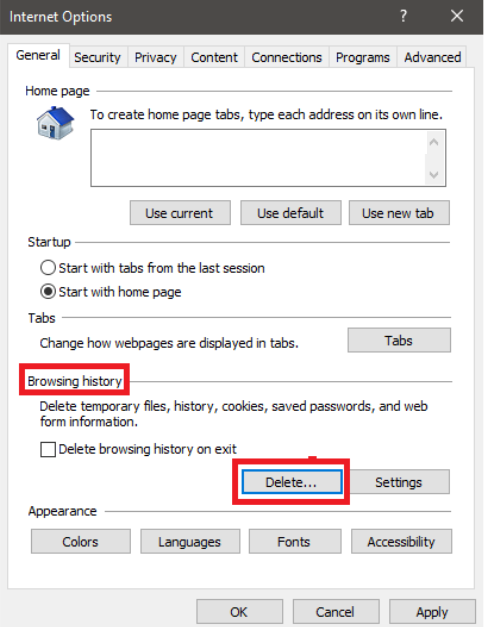
Under the General tab on the upper-left-hand side, scroll down to Browsing history.
Select Delete...
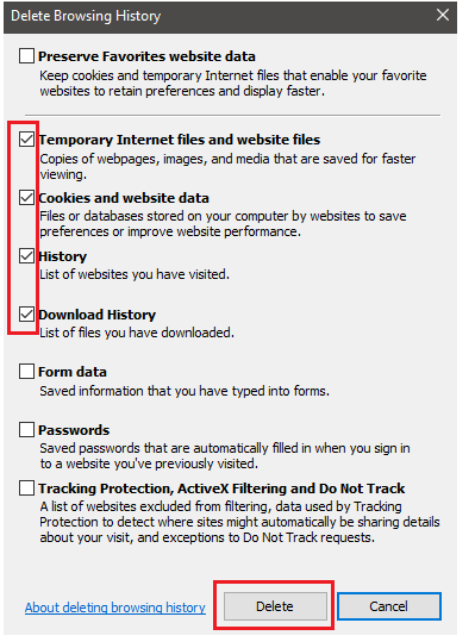
Check the Temporary Internet files and website files, Cookies and website data, History, and Download History boxes.
Select Delete.
Close Internet Explorer and reopen it for changes to take effect.
Go to the Settings app on your device.
Scroll down to the Safari menu.
Scroll down and select Clear History and Website Data.

A pop-up will come up verifying that you want to clear the History and Data. Select Clear History and Data.
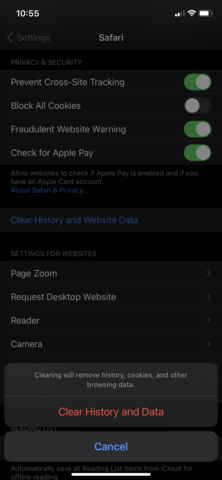
The button for Clear History and Website Data will turn gray when cache and cookies have been successfully cleared.
Open Google Chrome on your iOS device.
Click on the menu toolbar in the bottom right corner.
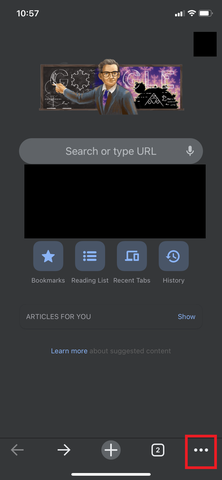
Select Settings.
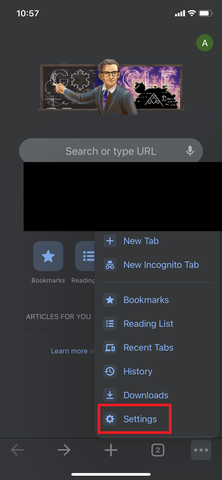
Select Privacy.
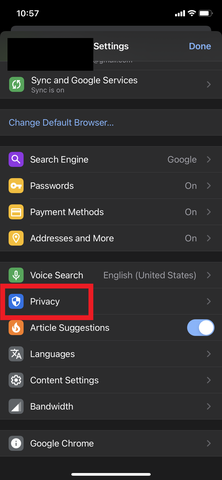
Select Cookies, Site Data, and Cached Images and Files. At the top, set the Time Range set to All Time.
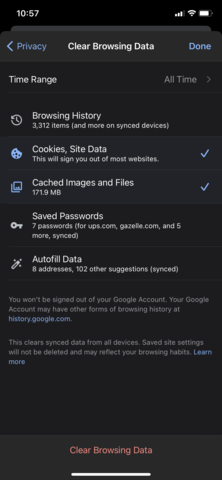
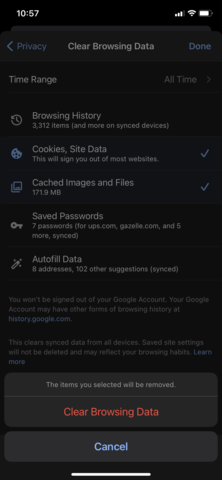
Click Clear Browsing Data at the bottom of the screen.
Then confirm by clicking Clear Browsing Data again.
Af hverju að hreinsa skyndiminni og vafrakökur?
Að hreinsa skyndiminni og vafrakökur (Cache and Cookies) úr vafra er mikilvægt fyrsta skref fyrir nánast hvaða bilanaleit sem er þegar vafrinn er til vandræða. „skyndiminni“ er tól sem netvafrarinn þinn notar til að flýta fyrir hleðslu síðunnar. Hins vegar getur það stundum valdið vandræðum þegar vefsíður eru uppfærðar og þróaðar þar sem skrár sem vistaðar eru í skyndiminni geta stangast á við það sem raunverulega er kóðað inn á vefsíðuna. Að hreinsa skyndiminni og vafrakökur er leið til að vera viss um að öll vandamál sem þú gætir rekist á séu í raun eitthvað að vefsíðunni, frekar en ósamræmi af völdum mismunandi vafra.
Why Clear Cache and Cookies?
Clearing the Cache and Cookies from a web browser an important first-step for almost any troubleshooting for internet browsing. The 'cache' is a tool used by your internet browser to speed up the page loading process. However, sometimes it can cause a problem when websites are updated and developed as files saved in the cache may conflict with what's actually coded into the website. Clearing Cache and Cookies is a way we can be sure that any issues you may come across are actually something wrong with the website, rather than inconsistencies caused by using different browsers.
Með VPN tengingu er hægt að tengjast neti HA utan háskólasvæðisins. Ýmis gagnasöfn og hugbúnaður sem er í boðið fyrir nemendur og eða starfsfólk krefst þess að vera tengdur háskólanetinu.
Til þess að nota VPN tengingu háskólans þarf að notast við hugbúnað sem heitir FortiClient. Fylgdu leiðbeiningum fyrir stýrikerfið á þínu tæki, hér að neðan til að setja upp FortiClient.
Using a VPN connection you can connect to the university network outside of the campus area. A number of data resources and software available to students and/or staff can only be accessed while connected to the university network.
To use the UNAK VPN connection users must connect through software called Forticlient. Follow the instructions for the operating system on your device, here below to set up FortiClient.
Smelltu hér til að ná í Windows uppsetningarpakkann.
Click the link to download the Windows VPN installerKeyrðu hann og settu upp hugbúnaðinn.
Run it and install the software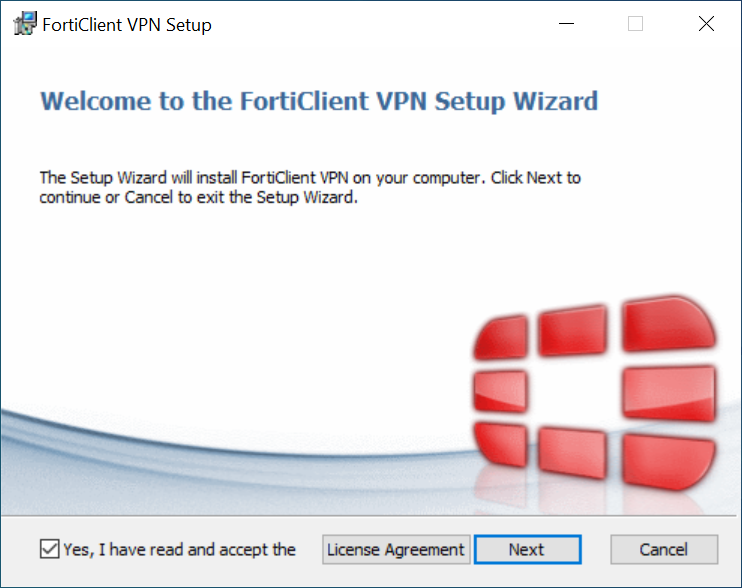
Þegar hugbúnaðurinn er uppsettur er FortiClient VPN opnaður hakaðu við I acknowledge og ýttu á I accept
When the software has been installed, open the FortiClient VPN and check I acknowledge and click I accept
Búðu til nýja tengingu með því að ýta á Configure VPN
Create a new connection by clicking Configure VPN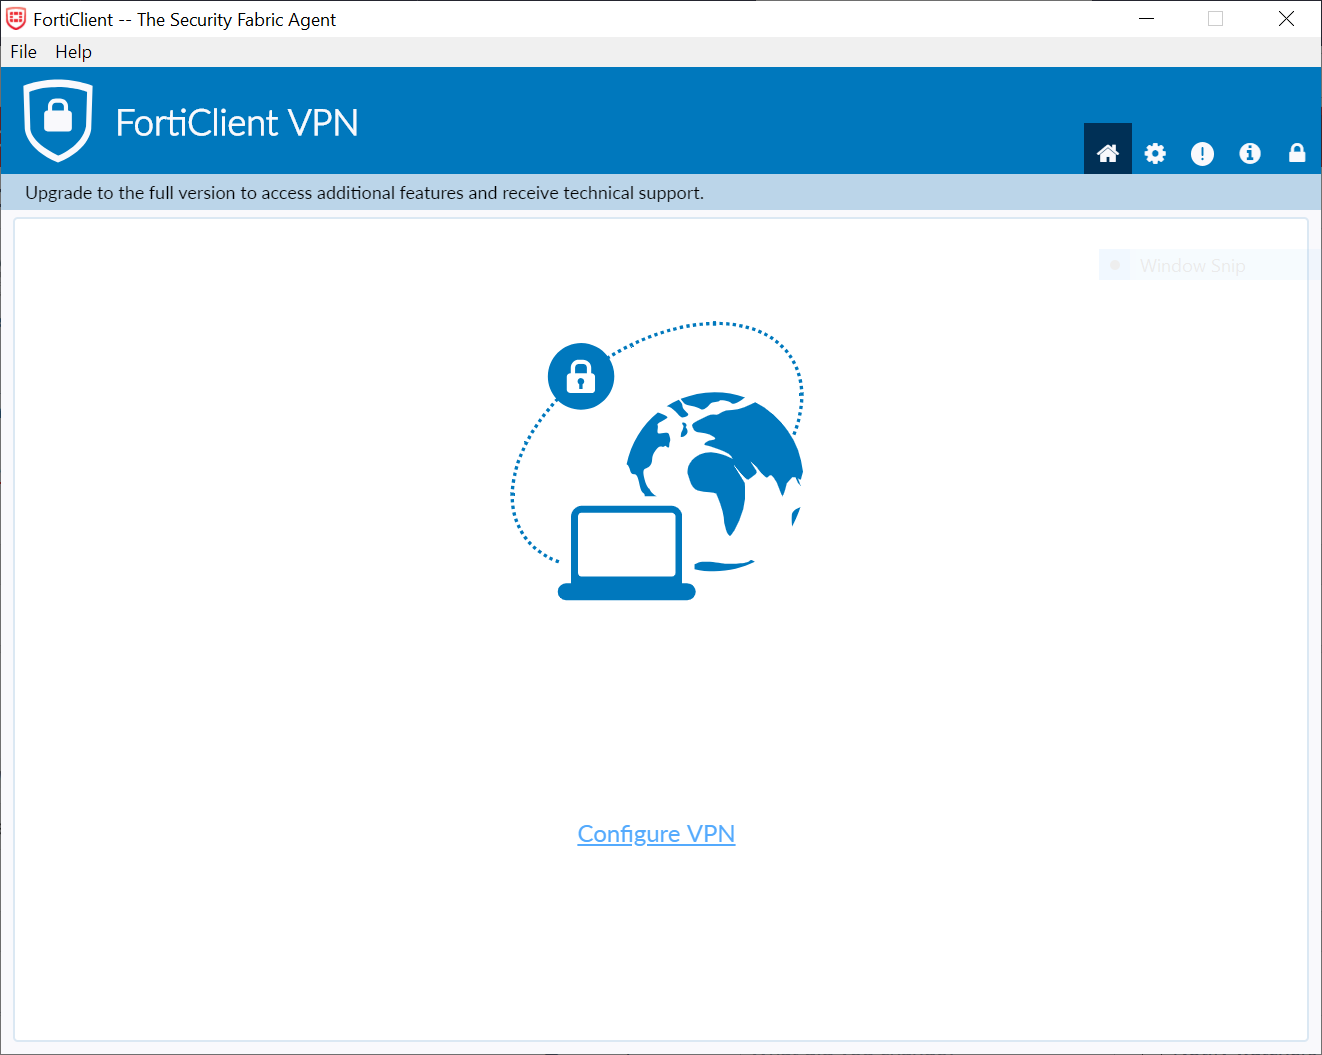
Stilltu inn eftirfarandi stillingar:
Put in the following settings: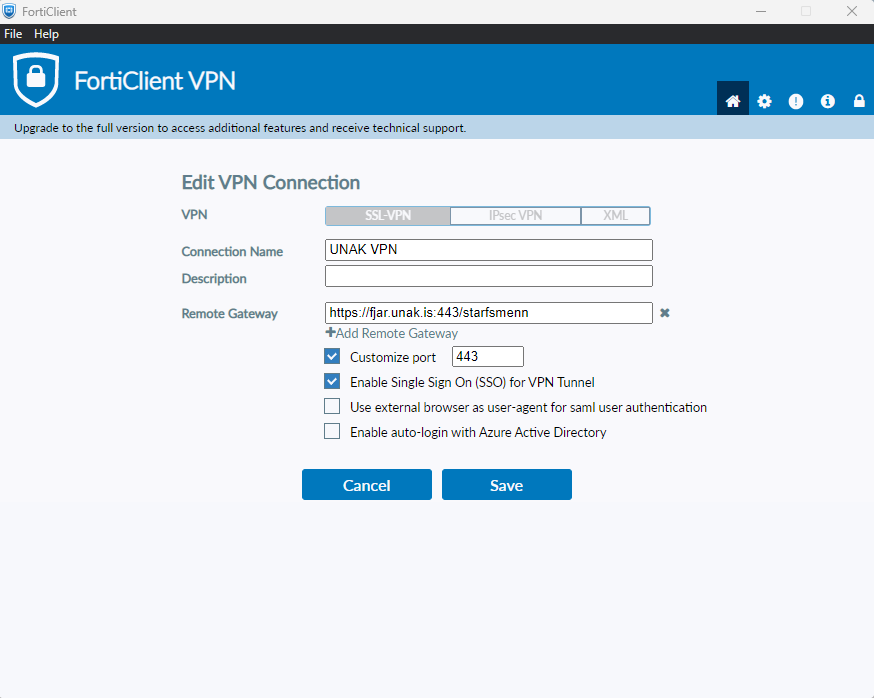
Connection Name: UNAK VPN
Remote Gateway:https://fjar.unak.is:443/starfsmennfyrir starfsmenn / for staff
https://fjar.unak.is:443/nemendurfyrir nemendur / for students
Customize port : Haka í og setja inn 443 ef ekkert kemur þar/ Check and insert 443 if it doesn’t automatically fill
Haka í “Enable Single Sign On (SSO) for VPN Tunnel”/ Check “Enable Single Sign On (SSO) for VPN Tunnel”Næst er ýtt á Save
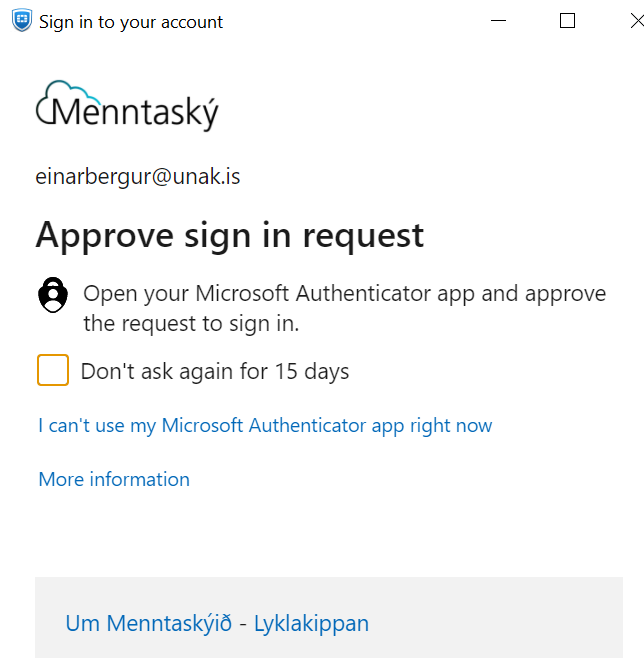
Click SaveÞá er hægt að ýta á SAML Login, sem opnar nýjan innskráningar glugga merktan Menntaský, þar setur þú skráir inn netfangið þitt, lykilorð og síðan samþyggja tveggja þátta auðkenni.
Now you can click SAML Login, that will prompt open a new sign in window for Menntaský, type your email address, then your password and finally approve in the autthendicator app.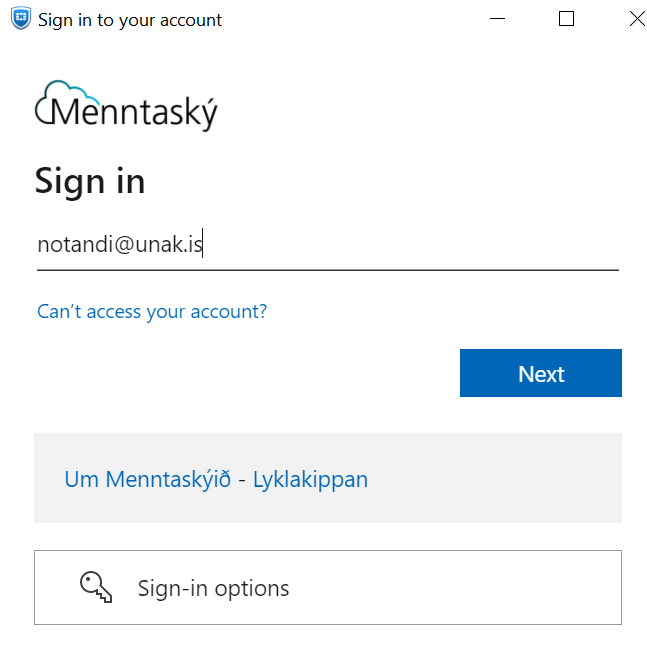
Athugið að Forticlient krefst macOS Montery eða nýrri útgáfur af stýrikerfi. Frekari upplýsinar má finna hér
Note that Forticlient requiers macOS Montery or a newer version of OS. Further information can be found here
Smelltu hér til að ná í macOS uppsetningarpakkann.
Click the link to download the macOS installerOpnaðu DMG skjalið og ýttu á FortiClientUpdate
Open the DMG file and click FortiClientUpdate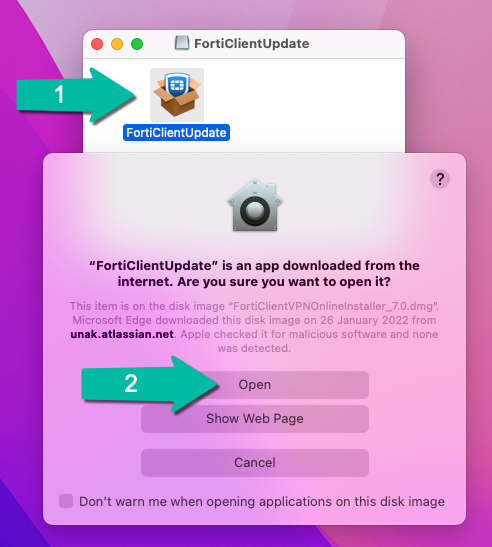
Þá hleðst FortiClient niður á tölvuna
Now FortiClient starts downloading to your computer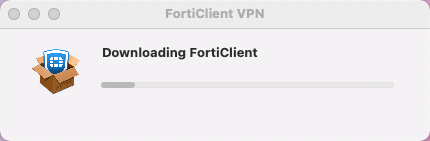
Þegar niðurhalið er búið ýtir þú á Install
When the download is finished click Install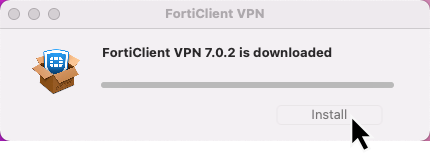
Í lok uppsetningar kemur öryggisgluggi sem spyr hvort þú viljir leyfa FortiTray á tölvunni.
Smella skal á “Allow”
At the end of the install you get a security alert asking if you want to allow FortiTray to run on your computer.
You should click Allow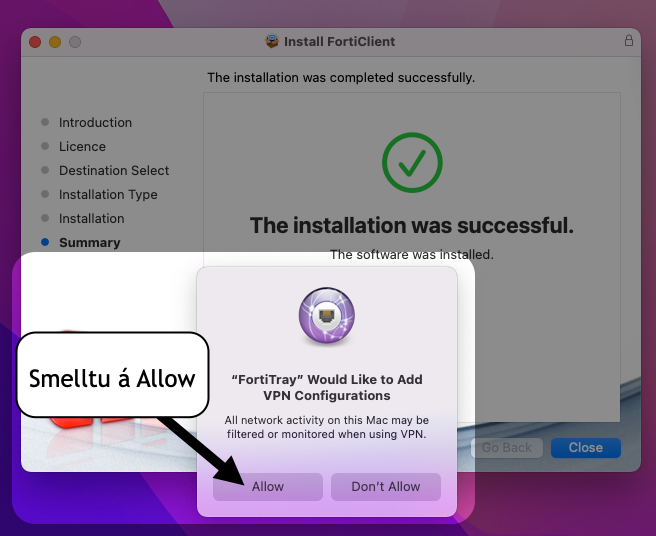
Þegar FortiClient er ræstur í fyrsta skipti þarf að samþykkja þessa skilmála.
When FortiClient is run for the first time you have to agree to these terms and conditions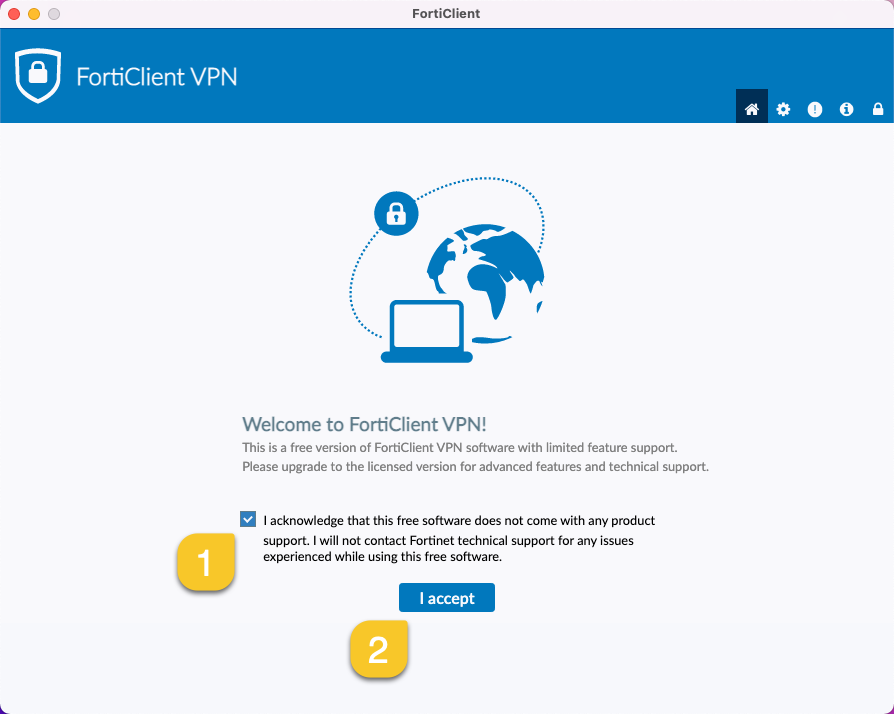
Þá er komið að því að setja stillingarnar inn til þess að geta VPN-tengst.
Now you put in the settings in order to connect to the UNAK VPN
Smelltu á: Configure VPN
Click: Configure VPN
Connection Name: UNAK VPN
Remote Gateway:https://fjar.unak.is:443/starfsmennfyrir starfsmenn / for staff
https://fjar.unak.is:443/nemendurfyrir nemendur / for students
Customize port : Haka í og setja 443 ef það er ekkert þar / check and type in 443 if it doesn’t fill automatically
Haka í “Enable Single Sign On (SSO) for VPN Tunnel”/ Check “Enable Single Sign On (SSO) for VPN Tunnel”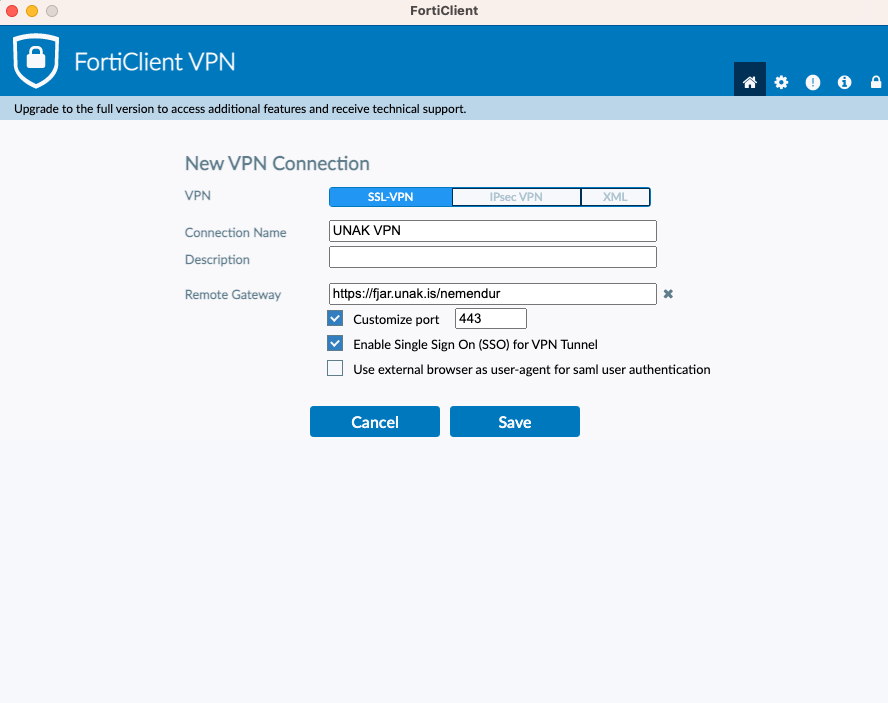
Næst er ýtt á Save
Click SaveÞá er hægt að ýta á SAML Login, sem opnar nýjan innskráningar glugga merktan Menntaský, þar setur þú skráir inn netfangið þitt, lykilorð og síðan samþyggja tveggja þátta auðkenni.
Now you can click SAML Login, that will prompt open a new sign in window for Menntaský, type your email address, then your password and finally approve in the autthendicator app.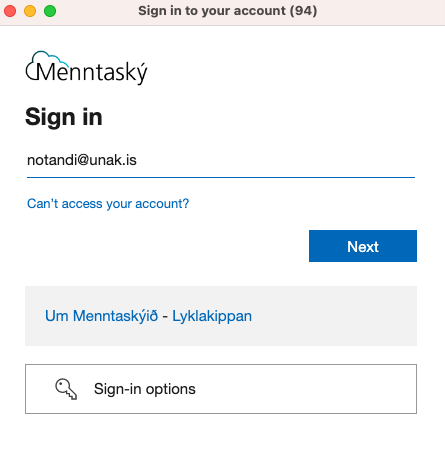
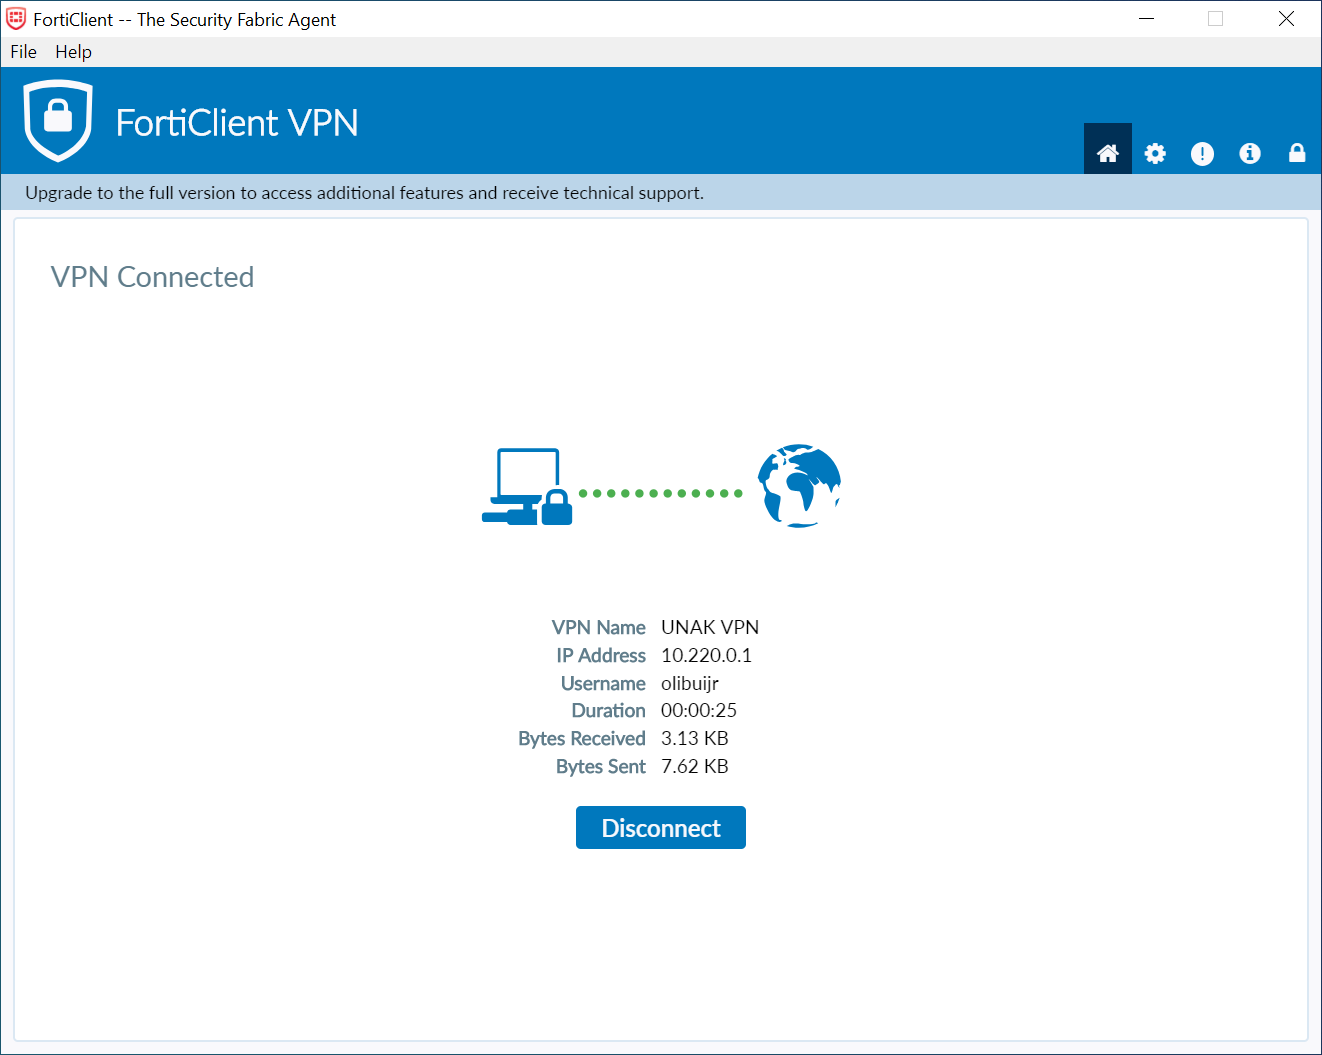
Ef allt er eðlilegt er VPN tenging nú komin á.
If everything is correctly done you should now be connected to the UNAK VPN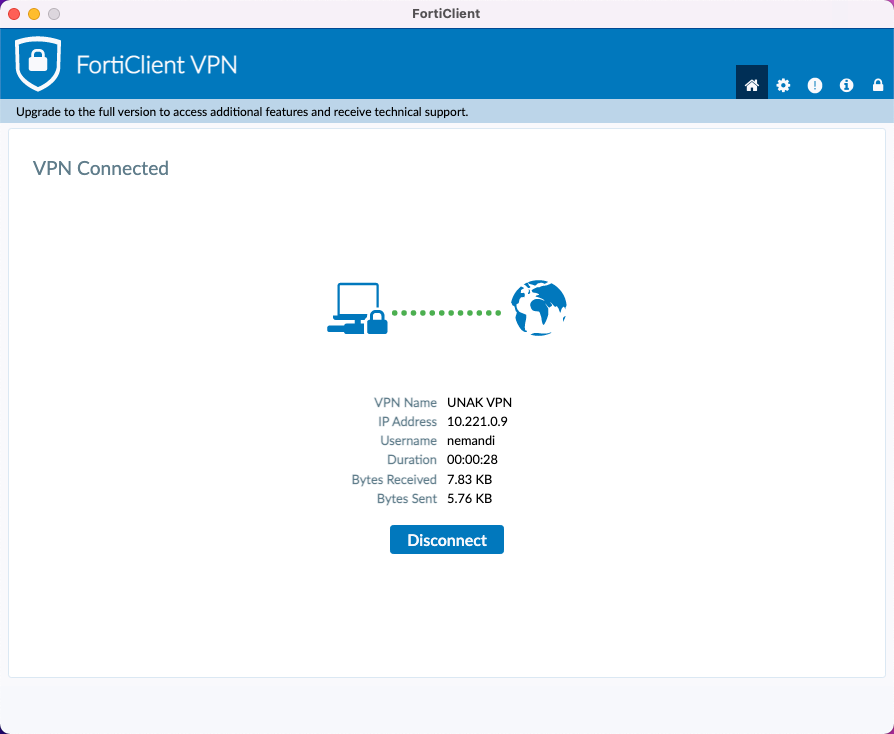
Virkar þetta ekki? / Doesn’t work?
Gæti verið að þú hafir óvart smellt á Don´t allow í upphafi þegar þú settir forritið upp?
Could it be that you accidentaly clicked Don’t allow when prompted to allow FortiTray in the setup pricessTil þess að komast að því / Find out:
Farðu í System Preferences > Security & Privacy. / Go to System Preferences > Security & Privacy
Smelltu á Allow takkann neðst þar sem stendur System software from application "FortiTray" was blocked from loading.
Click Allow at the bottom of the window where it says System software from application "FortiTray" was blocked from loading.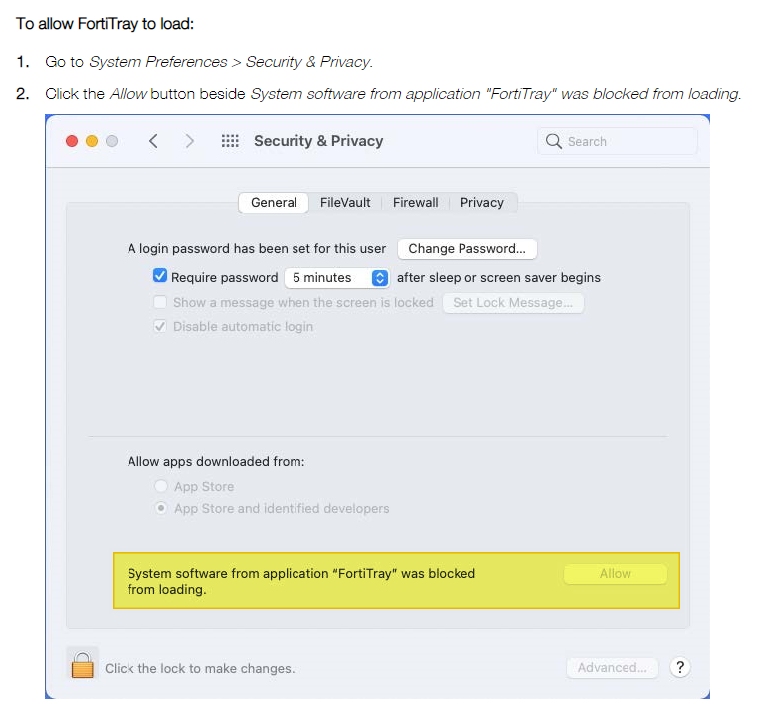
Ef þessi skilaboð eru sjáanleg neðst ætti að vera hægt að tengjast eftir að smellt er á “Allow“
Háskólinn er hluti af Menntaskýinu sem er með leyfissamning við Microsoft um aðgengi stúdenta og starfsmanna að Office 365. Í því er innifalið hefðbundni office pakkinn sem hægt er nálgast bæði í vefútgáfu en einnig er hægt að hala niður forritunum og setja upp á tölvunni. Jafnframt er þar innifalið geymslusvæði í gegnum OneDrive og aðgangur að Teams samskiptaforritinu. Þá er aðgengi að vefpósti háskólans í gegnum Outlook.
Smelltu hér til að skrá þig inn
UNAK is a part of “Menntaskýið” wich is a joint Microsoft tenant for the public universities in Iceland and gives both students and staff members access to Office365. Included in O365 is the tradition Microsoft Office software bundle that can be accessed both online but also downloaded and set up locally on your computer. Storage space through OneDrive and access to Teams communication app is also included. Lastly the unak web mail can be accessed through Outlook.
Click here to log in
Tveggja þátta auðkenning stuðlar að auknu netöryggi fyrir alla nemendur og starfsmenn.
Auðkenningin er ekki ósvipuð rafrænum skilríkjum og sendir tilkynningu í farsíma til að staðfesta innskráningu.
Smellið á tenglana hér að neðan til að fá leiðbeiningar um uppsetningu á tveggja þátta auðkenningu.
Multifactor Authentication contributes to increased network security for all students and staff.
The authentication sends a notification to a mobile phone to confirm login.
Click on the links below for instructions on setting up Multifactor Authentication.
Farðu inn á aka.ms/mfasetup (betra að gera þetta í öðru tæki en í símanum sem þú notar fyrir tveggja þátta auðkenninguna)
Goto aka.ms/mfasetup (better NOT to do this on the device that you are going to use for the authentication)
Sláðu inn HA netfang og smelltu á Next
Enter your UNAK email and hit Next
Sláðu inn aðgangsorð og smelltu á Sign in
Enter your password and hit Sign in
Smelltu á Next
Hit Next
Setja upp Microsoft Authenticator appið í símann og smella á Next
Install the Microsoft Authenticator app on your phone and hit Next
Smella á Next
Hit Next
Opna Microsoft Authenticator í símanum og bæta við reikningi
Open Microsoft Authenticator on the phone and add account
Skannið QR kóðann sem með símanum og smellið á Next
Scan the QR code with the phone and hit Next
Eftir að aðgangurinn hefur verið settur upp á appið í símanum, þá er betra að loka appinu áður en haldið er áfram
After the account has been set up on the app, please close the app before continuing to the next step
Nú þarf að staðfesta með því að samþykkja í símanum (neðri mynd)
Now you need to Approve on your phone (pic nr 2 below)
Ef staðfesting tókst þá smella á Next
If approving was successful hit Next
Tvíþætt auðkenning er klár smella á Done
Multifactor Authentication is ready hit Done
Við mælum með því að setja upp aðra aðferð eins og til dæmis SMS til þess að hægt sé að skrá sig inn ef ekki er hægt að nota Microsoft Authenticator
We highly recommend adding alternative sign-in method like SMS to use in case the authenticator app can not be used at the moment
Í security info, smellið á “+ Add method”
In “Security info, click on “+ Add method”
Veljið “Phone” og setjið inn farsímanúmer til að fá kóða í smáskilaboðum
Choose “Phone” and enter your mobile phone number to receive code in SMS
Ef vandamál kemur upp sjá / if problems during setup see
Vandamál í uppsetningu / Setup problems
Ef þú lendir í vandamálum í uppsetningu mælum við með þessum skrefum / If you run into problems we recommend taking these steps
Eyða út Menntaskýs aðgangi í Microsoft Authenticator
Delete Menntaský account from Microsoft Authenticator
Byrja ferlið aftur og nota tvö tæki, símann fyrir Authenticator og tölvu til að opna aka.ms/mfasetup
Start again but use two devices, your phone for Authenticator and a computer to open aka.ms/mfasetup
Sjá leiðbeiningar um uppsetningu / See instructions for setup
Uppsetning á tveggja þátta auðkenningu / Setup for Multifactor Authentication (MFA)
Ef það lokast á aðgengi til dæmis sökum þess að ekki er hægt að nota síma, þá er hægt að endursetja tveggja þátta auðkenninguna með því að skrá inn með rafrænum skilríkjum:
If you are unable to access your school account due to no access to the authenticator app and have access to electronic ID on Island.is, you can reset it by:
Fara inn á ugla.unak.is
Goto http://ugla.unak.is
Velja “Gleymt lykilorð?”
Choose “Forgotten password?”
Skrá inn með rafrænum skilríkjum
Log in using electronic ID
Velja skóla “Háskólinn á Akureyri”
Choose school “Háskólinn á Akureyri”
Smella á “Endursetja tveggja þátta auðkenni”
Click on “Endursetja tveggja þátta auðkenni”
Eftir það þarf að fylgja leiðbeiningunum um uppsettningu á tveggja þátta auðkenningu Uppsetning á tveggja þátta auðkenningu / Setup for Multifactor Authentication (MFA)
Follow the instructions Uppsetning á tveggja þátta auðkenningu / Setup for Multifactor Authentication (MFA)
Eftirfarandi eru leiðbeiningar um hvernig má setja upp Office 365 á Windows 10. Hver og einn notandi má setja upp Office 365 á allt að 5 tölvum.
Follow the steps below to install the MS Office bundle locally on your computer. Each UNAK user can install Office365 Apps on up to 5 devices.
Farið inn á portal.office.com og skráið ykkur inn.
Go to portal.office.com and log in.Smellið á "Install Office" og svo á "Office 365 apps"
Click “Install Office” and then “Office 365 apps”
Þá kemur smá gluggi sem segir þér hvað þú átt að gera, dæmi hér að neðan.
After that a small window appears, telling you what do next, see image below.
Þá er bara að gera eins og glugginn sagði, keyra skránna, segja já og vera nettengd/ur þar til uppsetningu er lokið. Leyfið breytingar ef stýrikerfið biður um slíkt.
Then there is just following the steps shown on the image, running the downloaded file, accept and make sure that the computer is connected to internet through the whole process. If your Operating system prompts you to allow this software to make changes, press “allow”.
Ef upp koma einhverskonar villur þegar reynt er að skrá sig inn í Office forritin í Mac tölvu er best að hreinsa Office pakkann af öllum Microsoft aðgöngum.
Það er gert með tóli frá Microsoft sem heitir License Removal Tool.
If an error occurs when trying to log in to Office software on a Mac it’s easiest to clear all Microsoft accounts from the software. That is done with a MS tool called License Removal tool.
1. Sækja skal license removal tólið hér.
Download the license removal tool here.
2. Settu upp tólið (.pkg skrá)
Install the tool (run the .pkg file)
Ath: Ef upp koma villuboðin "unidentified developer" prófaðu þá að halda inni Control + smella á skrána og fara þar í > Open.
Notice!: If the error message “unidentified developer” appears, try holding down Ctrl + “click on the file” and from there select > Open.
3. Í uppsetningunni er Continue valið nokkrum sinnum.
Through the installation you must click Continue a couple of times.

4. Eftir að hafa smellt á continue nokkrum sinnum er síðan valið Install.
Þú verður líklega beðin um að skrifa inn local lykilorðið á notandanum þínum á tölvunni.
Í lokin er smellt á Close.
After clicking Continue a couple of times you get the option of clicking Install, which you should do.
You will most likely be prompted to write the password for logging into your computer.
When the installation completes press Close. 
6. Eftir uppsetninguna er mikilvægt að endurræsa tölvuna
After the installation it is very important to restart the computer, for the changes to take effect.
Nú ætti að vera hægt að opna Office forritið og þá ætti strax að poppa upp innskráningargluggi frá Microsoft þar sem hægt er að skrá sig aftur inn.
Now you should be able to open the Office apps and immediately a Microsoft log in screen should pop up.
Allir notendur fá aðgang að 1TB geymsludrifi sem heitir OneDrive. Þetta er mjög hentugt til að geyma öll skólagögn, og meira til, og nýtist líka vel til hópavinnu.
Smelltu hér til að skrá þig beint inn á OneDrive.

Ugla er upplýsingakerfi HA og slóðin inn á hana er https://ugla.unak.is. Nemendur og starfsfólk háskólans hafa aðgang að eigin heimasvæði á Uglu og þar má m.a. finna bókalista, upplýsingar um námsferla, stundaskrár, tilkynningar, fréttir frá skólanum, auglýsingar frá háskólanum o.fl.
Það er mjög áríðandi að skoða Ugluna daglega þar sem allar breytingar á stundaskrám birtast þar.
Við innskráningu í Uglu á að nota “@unak.is” í notendanafni við innskráningu, eins og í öðrum kerfum Háskólans á Akureyri (t.d. Canvas og Outlook).
Ugla is the information system for UNAK, located at https://ugla.unak.is. Students and staff have access to their own “home space” where you can find course material, information on the learning track, schedule, announcements, news from UNAK, advertisements from UNAK and more.
It is very important to check Ugla daily as all schedule changes are shown there.
When logging into Ugla you must use “@unak.is” at the end of your username, as into other UNAK systems such as Canvas and Office365
Til að gera breytingar á forsíðu Uglu, smelltu á Breyta forsíðu.
To customize your Ugla frontpage, click “Change front page” in the upper right corner.

Þá opnast gluggi með valmöguleikum sem þú getur bætt við á forsíðuna þína í Uglu. Smelltu á hnappinn fyrir framan hvert atriði til þess að setja atriði inn eða taka það út.
This will display a window with a list of elements you can choose to display or hide on your front page. Click the toggle button in front of each element to enable or disable it.

Hægt er að færa atriði inn á forsíðunni með því að smella á gluggann og draga hann á nýtt svæði á síðunni.
You can rearrange elements on the front page by clicking the element frame and drag it into a new position.

Smelltu loks á Vista breytingar þegar búið er að ákveða hvað á að birtast á forsíðunni.
When your are done click “Save changes” to lock your edit in.

Hægt er að nálgast bókalista námskeiðs með því að smella á punktana þrjá við nafn námskeiðs og velja Yfirlit
You can access the course material for each course by clicking the three dots beside the course name and select “Overview”

Smelltu næst á Bókalisti.
From the list on the right side click “Course material”

Þá kemur upp bókalisti fyrir námskeiðið.
This brings up a table containing the list of course material

Smelltu á Uglan mín
Click “My Owl”

Velja Bækurnar mínar.
Choose “My books”

Hér kemur listi yfir allar bækur á bókalistanum.
This brings up a list of all your course material

Ath: Aðeins er hægt að breyta prófstað á ákveðnu tímabili. Sá tími er auglýstur hverju sinni.
Note: The possibility of changing examination location is only available for a selected period of time. That period is advertised each time.
Smelltu á Uglan Mín
Click “My Owl”

Smelltu á Breyta prófstað
Click “Change test site”

Námskeiðin þín birtast og þú getur skráð prófstaðinn þinn í hverju og einu prófi.
Your courses show up and you can select a location for each of your exams.

Smelltu á Uglan Mín
Click “My Owl”

Smelltu næst á Stundataflan mín.
Click “My schedule”

Hér sérðu stundatöfluna fyrir vikuna. Hægt er að skoða næstu vikur með því að smella á örvarnar fyrir ofan töfluna.
Here you can se the schedule for the week. You can go back and forth between weeks by using the arrows above the table.

EInnig er hægt að finna flipann Dagurinn, sem er inn á forsíðu Uglu, til að skoða stundatöflu fyrir einstakan dag.
On the front page you can find the element “My day”, where you can see the schedule for that day.

Smelltu á Uglan Mín
Click “My Owl”

Veldu næst Námskeiðin mín.
Choose “My courses”

Fyrir aftan hvert námskeið er tákn sem er fyrir úrskráningu úr námskeiði, smelltu á það og Ugla mun leiða þig áfram í gegnum ferlið.
Behind each course there is an icon for unregistering from the course. Click that icon and the Owl will guide you through the process.

Þegar þú hefur staðfest úrskráninguna birtist Úrsögn við námskeiðin sem þú valdir í Uglan mín->Námskeiðin mín.
When you have confirmed your withdrawal from the course you will see the course marked with “Unregistered” in your course list.

Canvas er námsumsjónarkerfi skólans. Þar finnur þú þá kúrsa sem þú ert skráð/ur í og þar koma inn skilaboð og upplýsingar frá kennurum, fyrirlestrar og annað námsefni og tenglar á fjarfundi þar sem það á við. Efni í kúrsum á canvas er á höndum kennara í hverju námskeiði.
Canvas is the learning management system for UNAK. There you have a list of the courses you arer registered and there you will receive messages from teachers, lectures and other course material and links to online lectures where that applies. Course material in Canvas is in the hands of the teachers in each course.
Byrjaðu á því að leita að Canvas Student í App Store (iOS) eða Play Store (Android) og setja upp forritið (e. Install)
Start by searching for Canvas Student in App Store (iOS) or Play Store (Android) and installing it.

Opnaðu forritið og Smelltu á Find my School.
Open the app and click “Find my school”

Skrifaðu inn Unak og smelltu UNAK sem birtist í listanum.
Write “Unak” and click “UNAK” when it appears in the list.

Skrifaðu inn HA notandann þinn og smelltu á Next.
Write your UNAK username (“@unak.is” included) and click Next

Settu inn lykilorðið þitt.
Write in your password
.png?version=1&modificationDate=1661866681546&cacheVersion=1&api=v2&width=340&height=694)
Hakaðu við Don´t show this again ef þú vilt fækka skiptum sem forritið biður þig um að skrá þig inn.
Check Don’t show this again if you want to reduce the number of times you are asked for sign in credentials

Hér getur þú valið hvernig þema þú vilt hafa forritið. Smelltu á Save til að vista valkostinn þinn.
Here you can choose the theme for the app. click Save to lock in your choice.

Núna er Canvas Student uppsett og þú hefur aðgang að námskeiðunum þínu.
Now the Canvas Student app is set up and you have access to your courses.

Byrjaðu á því að smella á notandann þinn og veldu tilkynningar (e. notifications)
Start by selecting your account and choose notifications.
Á þessari síðu er hægt að stilla hvernig þú færð tilkynningar frá kennslukerfinu.
Here you can choose for which activities and by which means you receive notifications.
Hægt er að velja um fjóra mismunandi stillingar á tilkynningum
There are four different settings available for receiveing a notification, for each activity.
Fá tilkynningar strax / Receive notification right away
Fá tilkynningar daglega / Receive notification daily
Fá tilkynningar vikulega / Receive notification weekly
Fá aldrei tilkynningar / Never receive notification

Á upphafssíðu námskeiðs, smelltu á Skoða tilkynningar námskeiðs (e. View Course Notifications)
On the course index site, click View Course notifications

Hér er hægt að stilla hvaða tilkynningar við viljum fá úr námskeiðinu.
Here you can select which notifications you receive from the course site.
Hægt er að velja um fjóra mismunandi stillingar á tilkynningum
There are four different settings available for receiveing a notification, for each activity.
Fá tilkynningar strax / Receive notification right away
Fá tilkynningar daglega / Receive notification daily
Fá tilkynningar vikulega / Receive notification weekly
Fá aldrei tilkynningar / Never receive notification
Þetta svæði opnast fyrst þegar þú skráir þig inn á kerfið í vefvafra.
This is the first thing you see when you log into Canvas through a web browser

Smelltu á punktana til að breyta viðmótinu.
Click the three dots to change the interface.

Hægt er að stilla skjáborðið á eftirfarandi máta:
The dashboard can be set in the following ways
Spjöld : Sýnir spjöld á námskeiðum sem nemandi er skráður í. Hægt er að gefa námskeiðum gælunöfn, flokka niður eftir lit og raða eftir hentusemi. Smelltu á punktana þrjá, í hverju spjaldi, til að gera breytingar
Card View. Shows cards for each of the courses a student is registered in. You can give the courses nicknames, define them by colors and sort them in numerous ways. Click the three dots, in each card, to make changes to that card.Listi : Listar niður öll verkefni og viðburði í námskeiðum
List view. Lists all assignments and events in the coursesNýleg virkni
Recent activity view
Byrjaðu á því að opna dagatalið.
Start by opening the calendar

Efst á síðunni getur þú stillt hvernig viðmótið á dagatalinu eftir viku, mánuði eða verkefnum (1). Hér birtist dagatalið á síðunni (2), viðmót dagatalsins birtist alltaf fyrst eftir mánuði. Til hliðar eru stillingar sem hægt er að velja mánuði, listi yfir námskeið og hópa sem þú ert í (3). Smelltu hér til að fá hlekk í iCal til að bæta þessu dagatali við önnur dagatöl (4).
1 On the top of the site you can change the calender view by week, month or assignments. 2 Here the calendar is shown. The default view is always by month. 3 In the sidebar you have settings where you can choose a month (or week if the view is set for weeks), a list of courses and groups you are a member of. 4 Click the link to receive a URL to add your canvas calendar to iCal, Google cal or other similar calendars.

Til að bæta atriði við dagatalið, smelltu þá plúsmerkið. Hægt er að bæta við verkefni, viðburði og persónulegum viðburði.
To add an item to the calendar, click the plus sign. You can add a task, an event or a personal event.

Hvert atriði í dagatalinu er skilgreint með sínum lit, öll atriði sem tengjast ákveðnum degi má finna í ramma þess dags (1). Það er sjálfkrafa valið í upphafi að það sjást fyrstu tíu námskeiðin sem þú ert að kenna. Til að fela dagatal námskeiðs, smelltu þá á kassann við hliðin á námskeiðinu (2). Dagatöl námskeiðs, sem eru falin, má finna í þessum lista (3).
Each element in the calendar is defined by it’s own color.

Til að skoða verkefni sem hafa ekki dagsetningu, smelltu þá á Ódagsett.
To view assignments that do not have a due date, click Undated

Verkefni og viðburðir eru skilgreind á eftirfarandi hátt. Við hvert atriði í dagatalinu er tákn sem gefur til kynna um tegund atriðis.
Assignments and events are defined in the following way. Each item in the calendar has an icon indication the type of the item.
Umræður / Discussion
Verkefni / Assignments
Próf / Exams
Viðburður / Events
Verkefni sem er ekki til einkunnar / Assignments not part of assessment
Til að skoða nánari upplýsingar um atriði í dagatali, færðu músarbendilinn yfir atriðið
To get further information about a calendar item, hover the arrow over it.Þegar skilafrestur er runninn á verkefni, þá kemur strik yfir titil verkefnis
When the due date of an item is passed it becomes crossed out

Viðburður í dagatali sem er yfir allan daginn er skilgreint með þessu tákni, ekki ert hægt að færa músarbendilinn yfir til að sjá nánari upplýsingar (1). Ef þú vilt lengja viðburð yfir nokkra daga, færðu músarbendilinn yfir viðburðinn þar til þú sér svarta ör. Smelltu á hana og dragðu yfir þá daga sem viðburðurinn á við (2).
1 An event that endures the whole day is defined with this icon, it cannot be hovered for more information. 2 If you want to extend an event over a couple of days, hover over the event until you se a black arrow. Click it and drag over the days that the event should last.

Svona lítur dagatalið út þegar það er skoðað eftir vikum.
This is how the calendar looks when viewed by weeks

Viðburðir sem taka allan daginn birtast efst á deginum.
Events that last throughout the day er shown at the top of each day.

Svona lítur dagatalið út þegar það er skoðað eftir dagskrá.
This is how the calendar looks when sorted by assignment

Byrjaðu á því að smella á Námskeið (1) og smelltu á nafnið á námskeiðinu (2).
Start by clicking Courses 1 and click on the name of the course 2

Upphafssíða á námskeiði samanstendur af þremur svæðum. Flettileiðir (1), forsíða (2) og námskeiðsstreymi (3).
The course index page consists of three different zones. 1 subpabes 2 Frontpage 3 Course Stream

Hægt er að fela flýtileiðirnar með því að smella á hamborgara táknið.
You can hide the subpages by clicking the hamburger icon.


Hægt er að fylgja brauðmolum (e. breadcrumbs) til baka í námskeiðinu.
When going into subpages, Canvas displays clickable breadcrumbs showing you where you are located, and making it easy to jump back

Í námskeiðsstreyminu er hægt að sjá hvað er næst á döfinni. Efst upp eru verkefni og tilkynningar og neðst kemur hvað er næst á dagskrá í dagatalinu og nýjustu endurgjafir frá umsjónarkennara.
In the course stream you can see what is upcoming in the course. On the top you see assignments and notifications and at the bottom you can see the next coming events in the calendar and the most recent feedback from teachers.

Opnaðu námskeiðið sem þú ætlar að skrá þig í hóp og smelltu á Fólk
Open the course in which you are going to join a group an click on People
Smelltu á Hópar
Click on Groups

Hér er hægt að skrá sig í hópa , yfirgefa hóp eða skipta yfir í annan hóp .
Here you can “join” a group, “leave” group or “switch to” another group

Opnaðu námskeiðið þar sem á að skila inn verkefni, og veldu Verkefni.
Open the course you want to hand in an select Assignments

Þá opnast síða með öllum verkefnum í námskeiðinu. Til að skila inn, smelltu á verkefnið.
This opens a list of all the assignments in this course. Click on the desired assigmnent to hand it in.

Þegar þú ert búinn að opna verkefnið, smelltu þá á Skila verkefni.
Click Submit assignment

Ef verkefni gildir ekki til loka einkunnar, þá stendur það efst á verkefninu.
If an assignment doesn’t count toward the final grade there will be a banner stating so at the top.

Umsjónarkennari ákveður hverskonar skil eru í boði fyrir verkefni:
The supervising teacher for each course what methods are available for handing in an assignment.
Hlaða inn skrá / File upload
Texta færsla / Text entry
Skila inn hlekk að heimasíðu / Website URL
Margmiðlunarefni (hjóð og/eða myndskrá) / Media files

Mundu að smella á Skila verkefni.
Remember to click Submit assignment

Þegar þú hefur skila verkefni inn, þá kemur gluggi sem staðfestir skilinn (1). Smelltu hérna til þess að skila verkefninu aftur inn (2).
1 When you have handed in an assignment a message apperars confirming the hand in. 2 A button then appears to re-submit the assignment

Um leið og umsjónarkennari hefur gefið einkunn fyrir verkefnið, þá birtist hún undir Einkunnir í námskeiðinu.
As soon as the supervising teacher has published grades for an assignment, it appears in the Grades panel in the course.

Til þess að sjá öll verkefni sem á að skila í námskeiði smellir þú á Verkefni í valmynd námskeiðs.
To see all the assignments in a course you click Assignment in the Course overview.
Nemandi getur valið á milli þess að sjá þau í tímaröð (Sýna eftir degi) eða smellt á Sýna eftir tegund og þá fæst yfirlit yfir það hvernig verkefnum er raðað í verkefnahópa og hvert vægi þeirra er í lokaeinkunn, hafi kennari stillt því upp.
You can choose between sorting the assignments by date or showing them by type, which gives an overview of how the assignments are sorted into assignment types and what they make of the final grade of the course, if the teacher has set these parameters for the assignments.
ATH. Kennarar birta ekki alltaf öll verkefni strax og því mikilvægt að kynna sér kennsluáætlun námskeiðs til þess að fá yfirlit yfir verkefnaskil.
Note! Teachers do not always publish all assignments right away and therefore it is important to get familiar with the class syllabus to get an overview of assignments in the course.