ALDREI gefa upp lykilorðið þitt og alls ekki senda það með tölvupósti! Ef þig grunar að einhver hafi komist yfir lykilorðið þitt að þá skaltu breyta því strax.
NEVER give up your password and absolutely do not send it via email! If you suspect that someone has managed to come by your email you should change it immediately.
Tveggja þátta auðkenning stuðlar að auknu netöryggi fyrir alla nemendur og starfsmenn.
Auðkenningin er ekki ósvipuð rafrænum skilríkjum og sendir tilkynningu í farsíma til að staðfesta innskráningu.
Smellið á tenglana hér að neðan til að fá leiðbeiningar um uppsetningu á tveggja þátta auðkenningu.
Multifactor Authentication contributes to increased network security for all students and staff.
The authentication sends a notification to a mobile phone to confirm login.
Click on the links below for instructions on setting up Multifactor Authentication.
Farðu inn á aka.ms/mfasetup (betra að gera þetta í öðru tæki en í símanum sem þú notar fyrir tveggja þátta auðkenninguna)
Goto aka.ms/mfasetup (better NOT to do this on the device that you are going to use for the authentication)
Sláðu inn HA netfang og smelltu á Next
Enter your UNAK email and hit Next

Sláðu inn aðgangsorð og smelltu á Sign in
Enter your password and hit Sign in

Smelltu á Next
Hit Next

Setja upp Microsoft Authenticator appið í símann og smella á Next
Install the Microsoft Authenticator app on your phone and hit Next

Smella á Next
Hit Next

Opna Microsoft Authenticator í símanum og bæta við reikningi
Open Microsoft Authenticator on the phone and add account


Skannið QR kóðann sem með símanum og smellið á Next
Scan the QR code with the phone and hit Next

Eftir að aðgangurinn hefur verið settur upp á appið í símanum, þá er betra að loka appinu áður en haldið er áfram
After the account has been set up on the app, please close the app before continuing to the next step
Nú þarf að staðfesta með því að samþykkja í símanum (neðri mynd)
Now you need to Approve on your phone (pic nr 2 below)


Ef staðfesting tókst þá smella á Next
If approving was successful hit Next

Tvíþætt auðkenning er klár smella á Done
Multifactor Authentication is ready hit Done

Við mælum með því að setja upp aðra aðferð eins og til dæmis SMS til þess að hægt sé að skrá sig inn ef ekki er hægt að nota Microsoft Authenticator
We highly recommend adding alternative sign-in method like SMS to use in case the authenticator app can not be used at the moment
Í security info, smellið á “+ Add method”
In “Security info, click on “+ Add method”

Veljið “Phone” og setjið inn farsímanúmer til að fá kóða í smáskilaboðum
Choose “Phone” and enter your mobile phone number to receive code in SMS
Ef vandamál kemur upp sjá / if problems during setup see
Vandamál í uppsetningu / Setup problems
Ef þú lendir í vandamálum í uppsetningu mælum við með þessum skrefum / If you run into problems we recommend taking these steps
Eyða út Menntaskýs aðgangi í Microsoft Authenticator
Delete Menntaský account from Microsoft Authenticator


Byrja ferlið aftur og nota tvö tæki, símann fyrir Authenticator og tölvu til að opna aka.ms/mfasetup
Start again but use two devices, your phone for Authenticator and a computer to open aka.ms/mfasetup
Sjá leiðbeiningar um uppsetningu / See instructions for setup
Uppsetning á tveggja þátta auðkenningu / Setup for Multifactor Authentication (MFA)
Ef það lokast á aðgengi til dæmis sökum þess að ekki er hægt að nota síma, þá er hægt að endursetja tveggja þátta auðkenninguna með því að skrá inn með rafrænum skilríkjum:
If you are unable to access your school account due to no access to the authenticator app and have access to electronic ID on Island.is, you can reset it by:
Fara inn á ugla.unak.is
Goto http://ugla.unak.is
Velja “Gleymt lykilorð?”
Choose “Forgotten password?”

Skrá inn með rafrænum skilríkjum
Log in using electronic ID
Velja skóla “Háskólinn á Akureyri”
Choose school “Háskólinn á Akureyri”
Smella á “Endursetja tveggja þátta auðkenni”
Click on “Endursetja tveggja þátta auðkenni”

Eftir það þarf að fylgja leiðbeiningunum um uppsettningu á tveggja þátta auðkenningu Uppsetning á tveggja þátta auðkenningu / Setup for Multifactor Authentication (MFA)
Follow the instructions Uppsetning á tveggja þátta auðkenningu / Setup for Multifactor Authentication (MFA)
Lykilorði er breytt í Uglu: ugla.unak.is - smelltu á myndina af þér uppi í hægra horninu - veldu “Breyta lykilorði”
Password is updated in Ugla: ugla.unak.is - click the picture in the upper right corner - select “Change password”
Fyrst slærðu inn það lykilorð sem er í gildi (Núverandi lykilorð). Svo skrifar þú nýtt lykilorð í næstu tvo reiti og smellir á "Breyta lykilorði".
First you type in the old password ( the current password). Then you type in the new password in the next two fields and click “Change password”.
ATH að Lykilorð verður að vera minnst tólf stafir að lengd og verður að innihalda að minnsta kosti þrennt af eftirfarandi
Note Passwords must be at least 12 characters of length and must include at least three of the following
Tölustaf / Numeral letter
Tákn / Symbol
stóran bókstaf / Captial letter
lítinn bókstaf / Non capital letter
Ekki er hægt að nota eigið nafn eða notendanafn í lykilorðinu né endurnota síðustu 3 lykilorð. Hægt er að nota íslenska stafi og sértákn en við mælum ekki með því vegna þess að stundum lenda notendur á lyklaborði sem ekki er með íslenska bókstafi.
It is not possible to use your own name or username in the password nor reuse the last 3 passwords. It is possible to use special characters, including Icelandic letters, but we don’t recommend it since sometimes users come across a keyboard without the their prefered language characters.
Ef þú hefur gleymt lykilorðinu þínu þá getur þú endursett það með því að fara á https://lykilord.menntasky.is Þegar þangað er komið þá skráir þú þig inn með http://island.is rafrænu skilríkjunum þínum.
If you forgot your password you can reset it by going to lykilord.menntsky.is, where you log in with electronic ID from ísland.is
ATH!Ef þú ert ekki með rafræn skilríki þarftu að hafa samband við kennslumiðstöð. best er að gera það rafrænt úr tölvupóstfanginu sem þú notaðir þegar þú sóttir um skólavist á helpdesk@unak.is .
NOTE! If you don’t have Icelandic electronic ID from Ísland.is you have to contact KHA. The most efficient way to do that is to contact via email using the mail you used to apply for studying at UNAK at helpdesk@unak.is

Eftir innskráningu er Háskólinn á Akureyri valinn úr fellilistanum
After logging in you select “Háskólinn á Akureyri” from the dropdown menu

Þegar búið er að velja Háskólann á Akureyri þá er nýja lykilorðið slegið inn og aftur í staðfestingar reitinn fyrir neðan og svo smellt á Breyta Lykilorði
After selecting “Háskólinn á Akureyri” from the drop down, the new password is put in the two following fields and then click “Breyta lykilorði”
ATH að Lykilorð verður að vera minnst tólf stafir að lengd og verður að innihalda að minnsta kosti þrennt af eftirfarandi
Note Passwords must be at least 12 characters of length and must include at least three of the following
Tölustaf / Numeral letter
Tákn / Symbol
stóran bókstaf / Captial letter
lítinn bókstaf / Non capital letter
Ekki er hægt að nota eigið nafn eða notendanafn í lykilorðinu né endurnota síðustu 3 lykilorð. Hægt er að nota íslenska stafi og sértákn en við mælum ekki með því vegna þess að stundum lenda notendur á lyklaborði sem ekki er með íslenska bókstafi.
It is not possible to use your own name or username in the password nor reuse the last 3 passwords. It is possible to use special characters, including Icelandic letters, but we don’t recommend it since sometimes users come across a keyboard without the their prefered language characters.

Núna fer af stað keyrsla sem breytir lykilorðinu þínu. Þú færð svo skilaboð um hvort það hafi heppnast eða ekki. Það getur tekið 1-3 mínútur þangað til að nýja lykilorðið er orðið virkt.
Now the system runs the changes on your passwords. You will revceive a message like the one below, telling you if the cange was successful or not. It can take up to 3 minutes for the new password to be enabled on all systems.
Ef lykilorð eru vistuð í vafra, þá er hægt að sýna þau á eftirfarandi hátt.
If passwords are stored in your browser then you can display them like shown below.
Í valmyndinni, veljið “Settings” → “Profiles” → “Passwords” → “Saved passwords”. Finnið viðkomandi síðu þar sem lykilorðið er vistað í og veljið augað til þess að sýna lykilorðið. Sláið inn lykilorðið inn á tölvuna ef þess þarf.
In the main menu select “Settings” → “Profiles” → “Passwords” → “Saved passwords”. Find the desired website and click the “eye” icon to display the password. If prompted type in the log in password for the computer.

Í valmyndinni, veljið “Settings” → “Autofill” → “Password manager”, finnið viðkomandi síðu þar sem lykilorðið er vistað, smellið á augað til að sýna lykilorðið og sláið inn lykilorðið inn á tölvuna ef þess þarf.
In the main menu select “Settings” → “Autofill” → “Password manager”. Find the desired website and click the “eye” icon to display the password. If prompted type in the log in password for the computer.

Í valmyndinni, veljið “Safari” → “Preferences” → “Passwords” og sláið inn lykilorðið inn í tölvuna. Smellið á viðkomandi vefsíðu til að sýna lykilorð
In the main menu select “Safari” → “Preferences” → “Passwords” and then type in the log in password for the computer. click the desired website name to show the password.

Það er mikilvægt að notendur skrái sig aldrei inn í hugbúnað eins og til dæmis Teams, OneDrive, Outlook, Word og Powerpoint sem dæmi nema á sínum eigin aðgangi á tölvunni þar sem stýrikerfi tölvunnar getur vistað aðganginn. Það þýðir að hver sem skráir sig inn á þeim aðgangi sem var innskráður getur farið inn á Teams svæði, tölvupóst, gögn og annað sem tilheyrir notandanum sem skráði sig inn. Þess vegna bendum við notendum á að opna huliðsglugga í vafrara og fara þannig inn á ugla.unak.is til þess að komast inn á þeirra svæði.
Ef notandi hefur hins vegar skráð sig inn fyrir slysni, þá skal fylgja þessum leiðbeiningum:
Smella á leitargluggann í windows stýrikerfinu og skrifa “Work or school”. Valmöguleikinn “Work or school users” ætti að birtast í listanum. Smellið á hann

Finnið notendanafnið ykkar í listanum, smellið á örina niður og veljið “Remove”

Nú hafið þið eytt aðgangsupplýsingunum ykkar úr stýrikerfinu. Ef þið hafið hlaðið niður skrám eða skráð ykkur inn á OneDrive, þá þurfið þið að finna þær skrár og eyða þeim handvirkt. Einnig mælum við með því að hreinsa skyndiminni vafrara með því að fylgja þessum leiðbeiningum
Flýtileiðir fyrir flesta vafra = Ctrl + Shift + Delete
MIKILVÆGT: Lokaðu vafranum og endurræstu hann eftir að hafa hreinsað skyndiminni og vafrakökur.
Keyboard Shortcut for Most Browsers = Ctrl + Shift + Delete
IMPORTANT: Be sure and close/quit the browser and restart it after clearing the cache and cookies.
Click the Tools menu (three dotted lines in the upper-right corner).
Select History.

Select Clear Browsing Data from the left-hand side. Set the Time Range set to All Time. Check-mark Cookies and other site data and Cached images and files and select Clear Data.
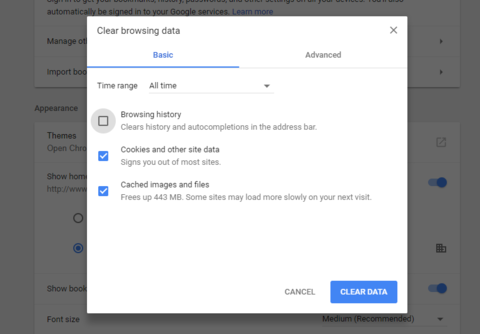
If on a Windows computer, close and re-open Chrome to save your changes. If on an Apple computer, go to the Chrome menu on the top menu bar and select Quit for the changes to take effect.
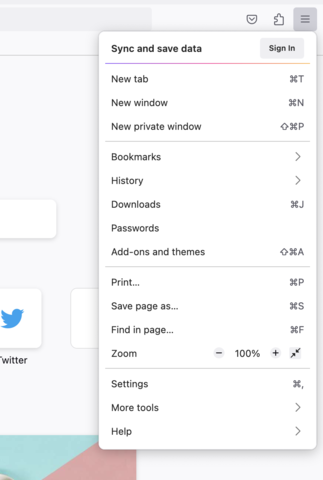
Click on the Tools bar.
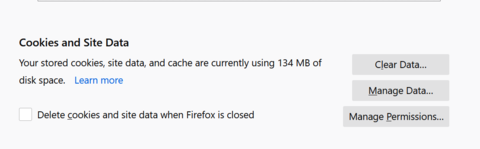
Click on Options (On Mac, it's labeled Preferences).
On the menu to the left, select Privacy & Security.
Under the Cookies and Site Data option, click the "Clear Data..." button.
Select only the two options and hit clear now.
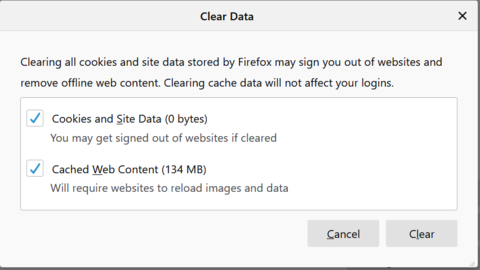
If on a Windows computer, close and re-open Firefox to save your changes. If on an Apple computer, go to the Firefox menu on the top menu bar and select Quit for the changes to take effect.
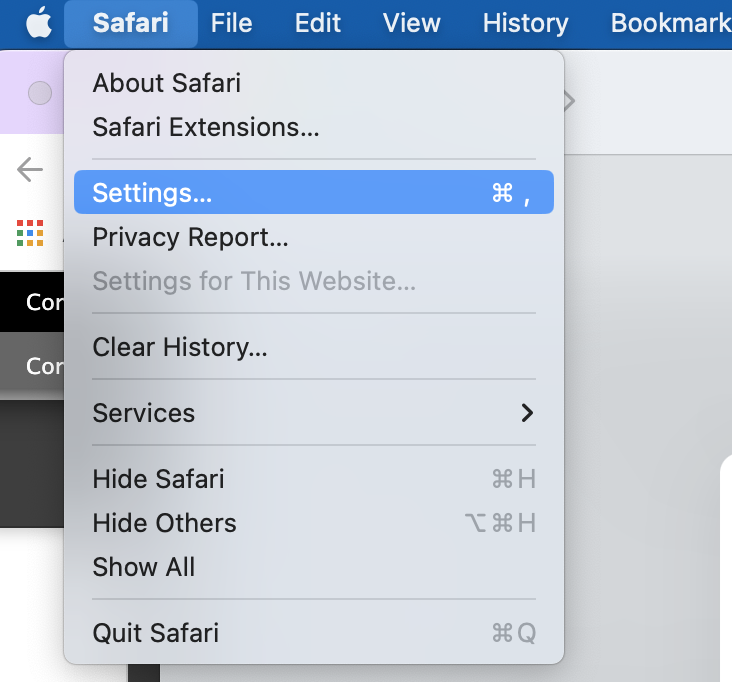
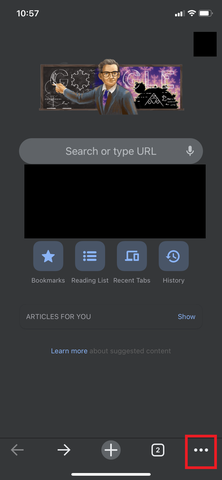
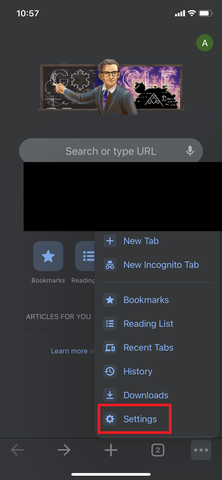
Click on Safari on the top menu bar.
Click Preferences.
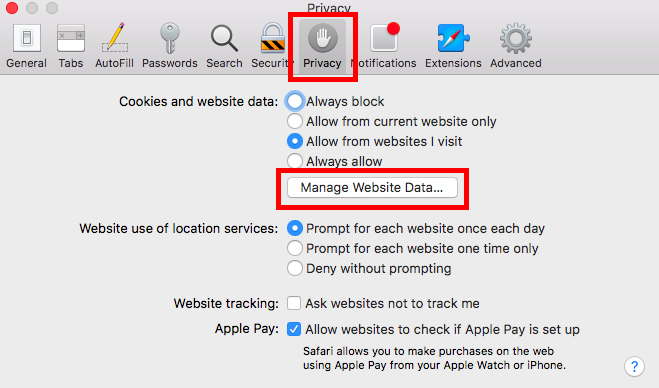
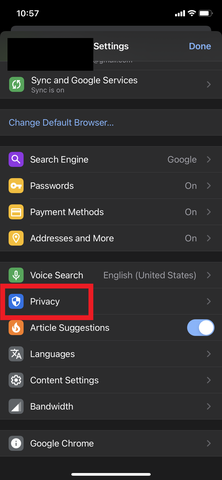
Click the Privacy tab.
Click Manage Website Data...
Click Remove All.
Click Remove Now.

Go to the Safari menu on the top menu bar.
Select Quit to close Safari and save your changes.
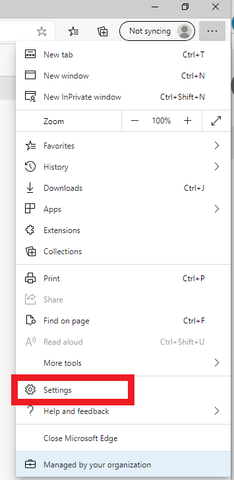
Click the Tools menu (three dotted lines in the upper-right corner), and open the Settings menu.
Click Privacy, search, and services on the left-side menu.
Under the section Clear browsing data, Click Choose what to clear.
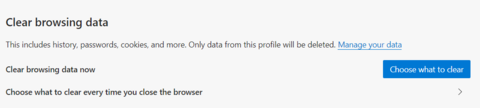
Select Cookies and other site data and Cached images and files.
Click Clear Now.
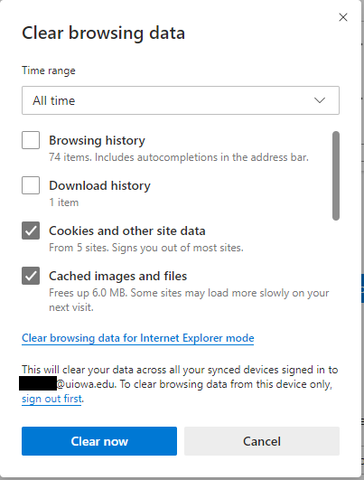
Close Microsoft Edge completely for your changes to take effect.
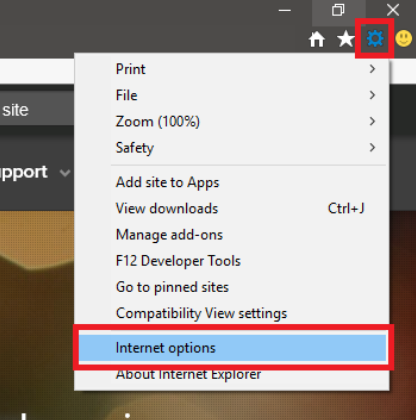
Click on the Settings menu in the upper-right corner.
Click Internet options.
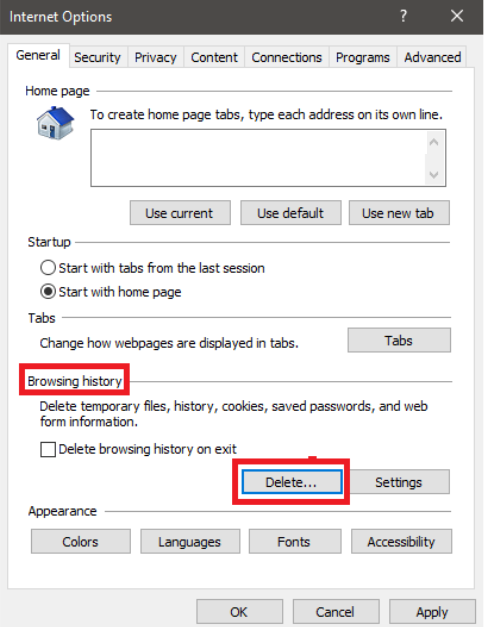
Under the General tab on the upper-left-hand side, scroll down to Browsing history.
Select Delete...
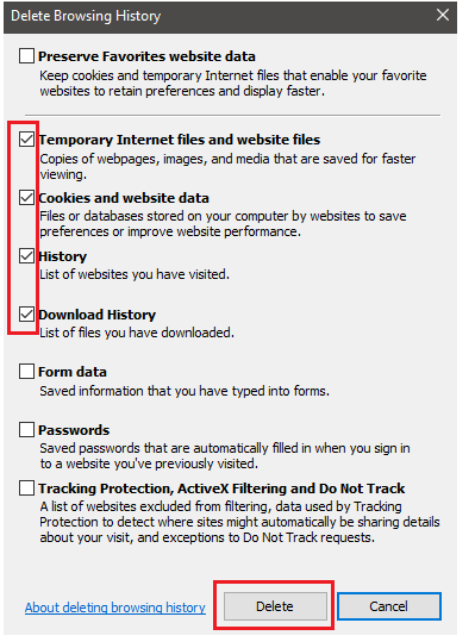
Check the Temporary Internet files and website files, Cookies and website data, History, and Download History boxes.
Select Delete.
Close Internet Explorer and reopen it for changes to take effect.
Go to the Settings app on your device.
Scroll down to the Safari menu.
Scroll down and select Clear History and Website Data.

A pop-up will come up verifying that you want to clear the History and Data. Select Clear History and Data.
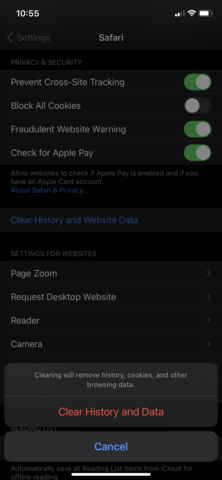
The button for Clear History and Website Data will turn gray when cache and cookies have been successfully cleared.
Open Google Chrome on your iOS device.
Click on the menu toolbar in the bottom right corner.
Select Settings.
Select Privacy.
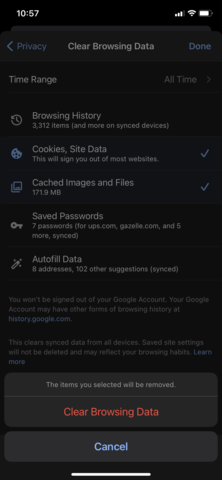
Select Cookies, Site Data, and Cached Images and Files. At the top, set the Time Range set to All Time.
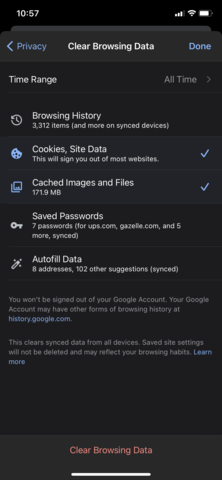
Click Clear Browsing Data at the bottom of the screen.
Then confirm by clicking Clear Browsing Data again.
Af hverju að hreinsa skyndiminni og vafrakökur?
Að hreinsa skyndiminni og vafrakökur (Cache and Cookies) úr vafra er mikilvægt fyrsta skref fyrir nánast hvaða bilanaleit sem er þegar vafrinn er til vandræða. „skyndiminni“ er tól sem netvafrarinn þinn notar til að flýta fyrir hleðslu síðunnar. Hins vegar getur það stundum valdið vandræðum þegar vefsíður eru uppfærðar og þróaðar þar sem skrár sem vistaðar eru í skyndiminni geta stangast á við það sem raunverulega er kóðað inn á vefsíðuna. Að hreinsa skyndiminni og vafrakökur er leið til að vera viss um að öll vandamál sem þú gætir rekist á séu í raun eitthvað að vefsíðunni, frekar en ósamræmi af völdum mismunandi vafra.
Why Clear Cache and Cookies?
Clearing the Cache and Cookies from a web browser an important first-step for almost any troubleshooting for internet browsing. The 'cache' is a tool used by your internet browser to speed up the page loading process. However, sometimes it can cause a problem when websites are updated and developed as files saved in the cache may conflict with what's actually coded into the website. Clearing Cache and Cookies is a way we can be sure that any issues you may come across are actually something wrong with the website, rather than inconsistencies caused by using different browsers.